Showing posts with label Tutorial. Show all posts

August 10, 2014

p0sixspwn v1.0.8 is released for Mac and Windows.

Earlier this month the developer of the p0sixspwn untethered jailbreak tool, Steven De Franco, otherwise known as iH8sn0w, confirmed that the standalone p0sixspwn tool has been updated to v1.0.8 with fixes for iTunes 11.1+ crashes. The update supports iPhone 3GS and iPod touch 4G running iOS 6.1.6. The latest version of p0sixspwn is available for both Mac and Windows.

Those interested will have to use Redsn0w to perform a tethered jailbreak and then install the p0sixspwn to convert the tethered jailbreak into an untethered version.

But with this latest released you don't need to jailbreak using redsn0w then p0sixspwn in this version you just need to have a  iOS 6.1.3 to iOS 6.1.6. and a p0sixspwn v1.0.8

Those who wish to jailbreak their iOS device untethered using the p0sixspwn (v1.0.8), may follow the step-by-step guide.

NOTE: I will not liable for any damage to the device. Before installing the untethered jailbreak, users are advised to verify their devices meet following requirements.

Points to remember
  • This guide is for iPhone, iPad and iPod touch running on iOS 6.1.3 to iOS 6.1.6. Navigate to Settings - > General - > About - > Version to check the software version of the device.
  • p0sixspwn tool is for untethered jailbreak.
  • Jailbreaking the iOS device will void manufacturer's warranty. And do not jailbreak the device to pirate apps from App Store.

Supported devices
P0sixspwn supports the following iOS devices
  • iPhone 3GS, iPhone 4, iPhone 4S, iPhone 5
  • iPod touch 4G and iPod touch 5G
  • iPad 2, iPad 3, iPad 4 and iPad mini
  • Mac OS X 10.6+ and Windows
Pre-requisites
  • Before performing the jailbreak, ensure that you have backed up all data of the device as this tutorial is likely to wipe out everything.
  • Disable passcode on the iOS device for the jailbreak process. Navigate to Settings - > General - > Passcode Lock - > Turn Passcode Off. Enable the Passcode once the jailbreak is installed on the device.
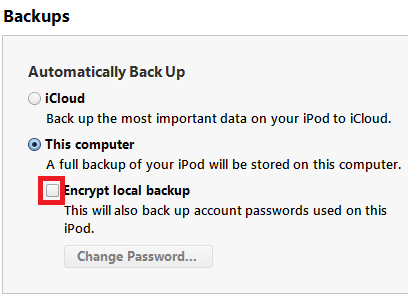
  • Uncheck Encrypt iPhone Backup option in iTunes for the jailbreak process. But ensure that you have enabled it after the jailbreak.
  • Verify the iOS device has above 80% battery. If the device powers off during the process due to the lack of battery, it could damage the device.

Steps to untethered jailbreak iOS 6.1.6 with p0sixspwn 1.0.8

Step01: Download the latest version of p0sixspwn jailbreak and save it on the desktop
Download links: Mac [Mirrors] or Windows [Mirrors]

Step02: Double click the downloaded file and extract the applicatio


Windows users- Extract p0sixspwn to the computer or C: drive or anywhere that you can see. Do not run it directly from the zip. Launch the application as an Administrator. Right-click on the exe file and select Run as Administrator.


Step03: Once p0sixspwn is launched, it will prompt to connect the iOS device to the computer


Step04: Connect your iOS device to the computer. p0sixspwn will show that the iOS device has been detected and the iOS firmware version


Step05: Click on Jailbreak button


NOTE: If your iDevice is not rebooting you can manually reboot your device just hold the power button then on the screen slide the button to power off.


NOTE: If you manually reboot your iDevice by power button it will not reboot just click the power button again to turn it on.


Step06: The jailbreak tool will give update about the jailbreak process, such as

Connecting to device...
Getting payload files from Apple.. (If this fails, your internet connection has issues...)
Gathering information to generate jailbreak data....
Sending initial data... [You should see Restoring in Progress on the iOS device]
Waiting to reboot. Do not unplug the device.
Waiting for device... [You should see the device has rebooted]
Remounting root....
Sending Cydia and untether payload to device to the device.... [After sometimes the device will reboot]
Your device is now jailbroken, it now preparing to reboot automatically.

Step07: when your iOS device rebooted, it should have been successfully jailbroken and Cydia icon should appear on the home screen of the device. Cydia might not be on the first page so search for it.


Troubleshoot issues

Mac users: If p0sixsown closes after rebooting the device on Mac, then try p0sixspwn v1.0.2.

Windows users: Extract the program to C: drive and run the program as an administrator.
Windows 8 users: who are still facing issues, try to run the app in Windows 7 compatibility mode. In order to change compatibility mode, right-click on the exe, click on Properties from the menu then click Compatibility tab. Check "Run this program in compatibility mode for" box and select Windows 7 from the menu.


In case you have issues jailbreaking the iOS device using p0sixspwn, you may try Redsn0w.

[Source: iPhoneHacks]

August 2, 2014

In Blogger, we have the option to set the number of posts we want to display per page by going to the Settings menu > Posts and comments > Show at most ? posts. Once the number of total posts in our blog exceeds this number, we will see "Older Posts" and "Newer Posts" navigation links in our home page and archive pages footer as Blogger doesn't have any built-in function on page numbering. But page numbers instead of older and newer posts links could help our blog visitors to navigate quicker (jump from one page to another page or click on a specific page) and know the total number of posts published. Here's a tutorial on how to add numbered page navigation using Javascript to a Blogger/ blogspot blog. You can select any one of the 7 different styles that I have mentioned below.


Adding Numbered Page Navigation to Blogger

You can add this widget in just two steps.

1. Adding The CSS.
2. Adding The Script.

Now let's see how to add the CSS style for page navigation.

1. Adding The CSS

Step 1. Go to Blogger Dashboard > Template > click on the Edit HTML button:


Step 2. Click anywhere inside the code area and press the CTRL + F keys to open the Blogger search box.


... type or paste the following tag inside the search box and hit Enter to find it:


]]></b:skin>
Step 3. Now choose one of the following numbered page navigation styles and copy the code just below it. Just above ]]></b:skin> paste the code of the style that you want to use:

Style 1

#blog-pager{clear:both;margin:30px auto;text-align:center; padding: 7px;}
.blog-pager {background: none;}
.displaypageNum a,.showpage a,.pagecurrent{padding: 3px 7px;margin-right:5px;background:#E9E9E9;color: #888;border:1px solid #E9E9E9;}
.displaypageNum a:hover,.showpage a:hover,.pagecurrent{background:#CECECE;text-decoration:none;color: #000;}
.showpageOf{display:none!important}
#blog-pager .showpage, #blog-pager .pagecurrent{font-weight:bold;color: #888;}
#blog-pager .pages{border:none;}
Style 2

#blog-pager{clear:both;margin:30px auto;text-align:center; padding: 7px;}
.blog-pager {background: none;}
.displaypageNum a,.showpage a,.pagecurrent{padding: 5px 10px;margin-right:5px; color: #F4F4F4; background-color:#404042;-webkit-box-shadow: 0px 5px 3px -1px rgba(50, 50, 50, 0.53);-moz-box-shadow:0px 5px 3px -1px rgba(50, 50, 50, 0.53);box-shadow: 0px 5px 3px -1px rgba(50, 50, 50, 0.53);}
.displaypageNum a:hover,.showpage a:hover, .pagecurrent{background:#EC8D04;text-decoration:none;color: #fff;}
#blog-pager .showpage, #blog-pager, .pagecurrent{font-weight:bold;color: #000;}
.showpageOf{display:none!important}
#blog-pager .pages{border:none;-webkit-box-shadow: 0px 5px 3px -1px rgba(50, 50, 50, 0.53);-moz-box-shadow:0px 5px 3px -1px rgba(50, 50, 50, 0.53);box-shadow: 0px 5px 3px -1px rgba(50, 50, 50, 0.53);}

Style 3

#blog-pager{clear:both;margin:30px auto; padding: 7px; text-align:center;font-size: 11px;background-image: -webkit-gradient(linear,left bottom,left top,color-stop(0, #000000),color-stop(1, #292929));background-image: -o-linear-gradient(top, #000000 0%, #292929 100%);background-image: -moz-linear-gradient(top, #000000 0%, #292929 100%);background-image: -webkit-linear-gradient(top, #000000 0%, #292929 100%);background-image: -ms-linear-gradient(top, #000000 0%, #292929 100%);background-image: linear-gradient(to top, #000000 0%, #292929 100%); padding: 6px;-webkit-border-radius: 3px;-moz-border-radius: 3px;border-radius: 3px;}
.blog-pager {background: none;}
.displaypageNum a,.showpage a,.pagecurrent{padding: 3px 10px;margin-right:5px; color: #fff;}
.displaypageNum a:hover,.showpage a:hover,.pagecurrent{background-image: -webkit-gradient(linear,left bottom,left top,color-stop(0, #59A2CF),color-stop(1, #D9EAFF));background-image: -o-linear-gradient(top, #59A2CF 0%, #D9EAFF 100%);background-image: -moz-linear-gradient(top, #59A2CF 0%, #D9EAFF 100%);background-image: -webkit-linear-gradient(top, #59A2CF 0%, #D9EAFF 100%);background-image: -ms-linear-gradient(top, #59A2CF 0%, #D9EAFF 100%);background-image: linear-gradient(to top, #59A2CF 0%, #D9EAFF 100%);text-decoration: none;color: #000;-webkit-border-radius: 3px;-moz-border-radius: 3px;border-radius: 3px;}
.showpageOf{display:none!important}.blog-pager-older-link, .home-link, .blog-pager-newer-link {background: transparent;}
a.blog-pager-older-link, a.home-link, a.blog-pager-newer-link {color: #fff;}
#blog-pager .pages{border:none;background: none;}

Style 4

#blog-pager{clear:both;margin:30px auto;text-align:center; padding: 7px;}
.blog-pager {background: none;}
.displaypageNum a,.showpage a,.pagecurrent{font-size: 14px;padding: 5px 12px;margin-right:5px; color: #666; background-color:#eee;}
.displaypageNum a:hover,.showpage a:hover, .pagecurrent{background:#359BED;text-decoration:none;color: #fff;}
#blog-pager .pagecurrent{font-weight:bold;color: #fff;background:#359BED;}
.showpageOf{display:none!important}
#blog-pager .pages{border:none;}

Style 5

#blog-pager{clear:both;margin:30px auto;text-align:center; padding: 7px; }
.blog-pager {background: none;}
.displaypageNum a,.showpage a,.pagecurrent{font-size: 13px;padding: 5px 12px;margin-right:5px; color: #3E5801; background-color:#E0EDC1;}
.displaypageNum a:hover,.showpage a:hover, .pagecurrent{background:#FEF6DF;text-decoration:none;color: #E16800;}
#blog-pager .pagecurrent{font-weight:bold;color: #D25E71;background:#FFDEDF;}
.showpageOf{display:none!important}
#blog-pager .pages{border:none;}

Style 6

#blog-pager{clear:both;margin:30px auto;text-align:center; padding: 7px; }
.blog-pager {background: none;}
.displaypageNum a,.showpage a,.pagecurrent{font-size: 13px;padding: 5px 12px;margin-right:5px; color: #AD0B00; background-color:#FAB001;}
.displaypageNum a:hover,.showpage a:hover, .pagecurrent{background:#DB4920;text-decoration:none;color: #fff;}
#blog-pager .pagecurrent{font-weight:bold;color: #fff;background:#DB4920;}
.showpageOf{display:none!important}
#blog-pager .pages{border:none;}

Style 7

#blog-pager{clear:both;margin:30px auto;text-align:center; padding: 7px; }
.blog-pager {background: none;}
.displaypageNum a,.showpage a,.pagecurrent{font-size: 12px;padding: 5px 12px;margin-right:5px; color: #222; background-color:#eee; border: 1px solid #EEEEEE;}
.displaypageNum a:hover,.showpage a:hover, .pagecurrent{background:#E5E5E5;text-decoration:none;color: #222;}
#blog-pager .pagecurrent{font-weight:bold;color: #fff;background:#DB4920;}
.showpageOf{display:none!important}
#blog-pager .pages{border:none;}

Note: if you want to hide the "First" and "Last" buttons add this line below the CSS code:

.firstpage, .lastpage {display: none;}

2. Adding The Script


Step 4. Now find (CTRL + F) this tag:

</body>
UPDATED! working version for more than 500 posts!

Step 5. Add the following script just above it:

<b:if cond='data:blog.pageType != &quot;item&quot;'>

<b:if cond='data:blog.pageType != &quot;static_page&quot;'>

<script type='text/javascript'>

  /*<![CDATA[*/

    var perPage=7;

    var numPages=6;

    var firstText ='First';

    var lastText ='Last';

    var prevText ='« Previous';

    var nextText ='Next »';

    var urlactivepage=location.href;

    var home_page="/";

  /*]]>*/

</script>

  <script src="http://helplogger.googlecode.com/svn/trunk/page-navigation2.js"/>

</b:if>

</b:if>


Configuration

After installing, you might want to change these default settings:

perPage: 7,

numPages: 6,

var firstText ='First';

var lastText ='Last';

var prevText ='« Previous';

var nextText ='Next »';

}
1) perPage: how many posts will be shown in each page (7). This value has to be the same as the number of posts on the main page. Otherwise, add the same number by going to "Settings" > "Formatting" and type it in the "Show at most" field.
2) numPages: how many pages will be shown in the page navigation (6)
3) to replace the 'First', 'Last', "« Previous" and "Next »" texts, just type your own within the quotes.


Step 8. Click on the Save Template button and that's it! Enjoy!
filed under: , ,

September 18, 2011

In this tutorial I'm using an iPod Touch 4G 32gb Version 4.3.3 using JailbreakMe 3.0 and you will learn how to jailbreak your iDevice in a simple steps using jailbreakme 3.0.

Thanks to Julie Anne Pereras for her iPod Touch

First what is Blogger Navbar?
Blogger Navbar
This is a Navigation Bar at the top of your page and sometime its so annoying if you have one and most of the time your blogger templates are not compatible of the Navbar so if you want to remove the blogger navbar here's a simple steps on how to remove the Navbar of blogspot.

filed under: ,

September 7, 2011


Here is a Guide on How to Setup Blogger with NameCheap
(In this tutorial you already have a NameCheap Domain)

filed under: , ,
Why do you need to have your own domain name?
For me because of the uniqueness and you have the authority to choose what name you want for your blog/website and the most important thing is removing the blog name in your website url like the www.blogname.blogspot.com so that's also my reason why i want to change my domain name and having your own domain name you will gain more traffic and it will increase your popularity in search engines like google and yahoo and other popular search engines.

filed under: , ,

August 11, 2011

Why you need to convert your Paypal Balance to another Currency?
It is because some sellers are not using US Dollars (USD) or other currency so when you buy using Paypal and the currency is different from your Paypal Currency tendency is your Primary Credit Card will be charged in this transaction.


filed under: ,

August 2, 2011

What you need?
You can used the search engine in searching for the best Paid Rapidleech but most of them are new, not tested or not stable, sometimes their servers are down and can't be use, not all known premium accounts are installed and sometimes their are no premium accounts are installed.

I'm recommending NewRapidleech why? because this is what I'm using right now and I think this is the affordable and the cheapest Paid Rapidleech as of now that can give all of the most important fileshoting sites and most important functions that a uploader or a leecher needs.


What is Paid Rapidleech?
Paid Rapidleech are Servers that you will pay or buy to have your own leech servers.

What are the Benefits having Paid Rapidleech Servers?
For Uploaders like me this is the most important thing that uploaders should have after they have a successful earnings in uploading files.


July 25, 2011

Don't you like the new facebook chatbox? if you don't like the new facebook chatbox their is a easy way to return the old facebook chatbox. How? Read the whole tutorial on how to return the old facebook chatbox to learn the steps on how to return the old chatbox.

It will work for Mozilla Firefox and Google Chrome browsers I don't know if it will also work in other browsers but I tested it on my Mozilla Firefox and it works fine thanks to GreaseMonkey.


filed under: , ,

July 7, 2011

What You Need?
  • Your iDevice
  • Wi-Fi Connection
  • Mobile Terminal
  • Cydia - Latest Version can be Found Here
  • WinSCP

May 29, 2011

What you need?
  • A Yahoo account for Yahoo Pipes
  • A Twitter Account
  • A Twitter Feed Account
Why do you need this?
if you are using your twitter as an advertising account by using adfly links to earn money in your twitter account and it will looks like a spam account if your not using it by posting to other members or twitting anything on your twitter so in this tutorial your twitter account will be a twitter bot it will re twit others twit so your account will not be a spam account.

May 12, 2011

What is a Social Bookmarking buttons? and what are the benefits of this buttons?
Social Bookmarking buttons are buttons that can increase your blog traffic by the people who visits your blog and click the Social Bookmarking buttons they will share your blog post in the social networking like in facebook, twitter, stumbleupon, digg, and in google buzz with the help of this button they can easily spread your blog post and more chance of visitors will come on your blog.

A Floating Social Bookmark in your blog is much cleaner and more attractive to the visitors on your blog because it will float on the page as they scroll down and up they will follow.

Submitting your blog post in the social bookmarking sites will help to increase blog traffic and the search engines can easily find you blog post with the help of social bookmarking sites.

May 11, 2011

How does this work?
adf.ly is an innovative service that allows you to earn money from each visitor to your shortened links. How this works is actually quite simple. First, you shorten your links with our site, and then you post them or send them to people as you usually would with any shortened link. We handle the rest by showing an ad before the shortened link loads. Each ad that is shown earns you money!


filed under: , , ,

May 7, 2011

What You Need?

May 4, 2011

What do you need?

filed under: , , ,
What do you need?

filed under: , , , ,

May 3, 2011

If your Blog title appears first followed by Blog post title in search engine ,then just keep reading the post to solve this problem. Before going to solution, I will explain you how this event can make a bad effect on your Blogs or sites traffic.

For example, your blog title is "Getting Started" and blog post title "Tips in Uploading Fileserve, Hotfile, Filesonic and Earn Money in an Easy Way". If anybody search for this post , he may see this post in search engine like this:


filed under: , ,
What is a Favicon?
A favicon (short for favorites icon), also known as a shortcut icon, website icon, URL icon, or bookmark icon is a file containing one or more small icons, most commonly 16×16 pixels, associated with a particular website or web page.

filed under: , , ,

April 30, 2011

Most people uses twitter for social networking and for communication but for me as a blogger I'm using twitter as an advertiser I place my links or post on my twitter account so that my followers and other people can read my post and their is a chance that people will click the link to visit my post or my blog and because of this my blog will gain more traffic using twitter.

filed under: , , ,
Copyright © 2013 iamjasonangel | Powered by Blogger
Follow Me: Twitter
Blogger Template by jasonangel | Facebook